Introduction
Recently, I wanted to find a cost-effective solution to archive my pictures. I was using a NAS at home but it can fail at any time, so it was not a good long term solution. Being an AWS consultant, I naturally thought of using Amazon S3 to provide the durability needed.
I store around 40 000 pictures (120 GB) at the moment so using Amazon S3 Standard would cost about $3 per month ($0.024 per GB). This is more than I would like to pay. Fortunately, Amazon S3 offers different storage classes, which can help achieve better cost efficiency such as S3 Glacier Deep Archive ($0.0018 per GB) so a tenth of the price.
The downside of using Glacier Deep Archive is that once you archive an object, you need to restore it before being able to download it. It’s not optimal when you are searching through thousands of pictures. So I decided to generate thumbnail of each picture and storing it alongside the initial picture. I could easily browse through thumbnails and then restore only the file I needed. The reduced size and quality reduces the storage cost to a few cents per month for all the thumbnails.
In order to convert automatically all my pictures, I decided to write a custom AWS Lambda function in Rust which would generate the thumbnail and archive the original picture.
Why Rust ? I wanted to learn something new. Although AWS APIs and Lambda functions are my bread and butter, I am mostly using Python at work. This project seemed a good fit to transpose existing knowledge into a new language.
This blog post will go through the different steps to implement this solution.
Overview of the solution
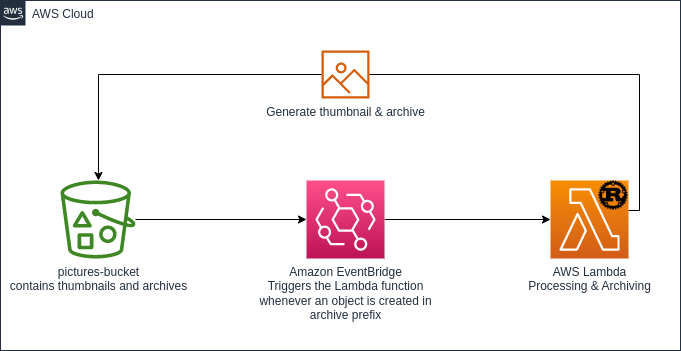
The following architecture diagram represents the solution being built.
Setting up your environment to build AWS Lambda functions in Rust
My development environment is Ubuntu Linux 22.04. It relies on Rust and Cargo Lambda and SAM.
Install rust
The first step is to install Rust on your computer if you have not already done so. The official documentation is here.
curl --proto '=https' --tlsv1.2 -sSf https://sh.rustup.rs | sh
Install cargo lambda
Cargo lambda is an open-source tool to streamline the development of AWS Lambda functions.
pip3 install cargo-lambda
Install SAM CLI
SAM CLI streamlines the deployment of AWS Resources using CloudFormation templates.
curl -LO https://github.com/aws/aws-sam-cli/releases/latest/download/aws-sam-cli-linux-x86_64.zip
unzip aws-sam-cli-linux-x86_64.zip -d sam-installation
sudo ./sam-installation/install
Initialize your folder
Using cargo lambda, we will bootstrap a new repository to host our code.
cargo lambda new image-archiver --no-interactive
It will create a new image-archiver folder, go into it and open it with your preferred editor. The folder contains a simple Rust structure with Cargo.toml to define the project and its dependencies as well as a src/main.rs file.
The toml file contains the description of the Rust project as well as its dependencies.
|
|
- lambda_runtime is a library that provides a Lambda runtime for applications written in Rust.
- serde is a library to serialize and deserialize.
- tokio is a library for asynchronous workload
- tracing and tracing subscriber are tracing and logging libraries.
If we want to add new dependencies, we can use the cargo add command.
The src/main.rs contains the actual code which will run in the function. I’ve stripped some parts that are not useful at the moment.
|
|
Write your function
Implementation logic
The implementation logic will be as follow:
- An Amazon EventBridge event triggers the Lambda function
- The function downloads the object
- The function generates the thumbnail
- The function uploads the thumbnail to Amazon S3
- The function archives the original object.
Parsing Amazon EventBridge in the function
Whenever a new object, a picture in our case, is uploaded into our Amazon S3 bucket, Amazon EventBridge will react to this event and trigger the lambda function with a similar payload.
{
    "version": "0",
    "id": "2d4eba74-fd51-3966-4bfa-b013c9da8ff1",
    "detail-type": "Object Created",
    "source": "aws.s3",
    "account": "123456789012",
    "time": "2021-11-13T00:00:59Z",
    "region": "us-east-1",
    "resources": [
        "arn:aws:s3:::photos-archive"
    ],
    "detail": {
        "version": "0",
        "bucket": {
            "name": "photos-archive"
        },
        "object": {
            "key": "archive/2023/01/01/DSC_12345.jpg",
            "size": 99797,
            "etag": "7a72374e1238761aca7778318b363232",
            "version-id": "a7diKodKIlW3mHIvhGvVphz5N_ZcL3RG",
            "sequencer": "00618F003B7286F496"
        },
        "request-id": "4Z2S00BKW2P1AQK8",
        "requester": "348414629041",
        "source-ip-address": "72.21.198.68",
        "reason": "PutObject"
    }
}
To find the Amazon S3 Bucket name and object key to download the picture and generate the thumbnail, we need to create structures (Struct) to parse the event. We will map only the necessary fields. You can replace the initial sample request and response of the main.rs file with following snippet.
|
|
We see here that we need to create one structure for each level of our initial payload until we can get the value we need. Rust is a strongly typed language so we also need to update the function_handler input and output types.
Download the object
To download the object we will need to use the AWS SDK for Rust (Developer preview). The SDK comes as libraries and can be added by running cargo add. In our project, we need to add aws-config to handle the environment configuration and retrieve credentials as well as aws-sdk-s3 to interact with Amazon S3 APIs. Packaged dependencies are also called crates and available on crates.io.
cargo add aws-config
cargo add aws-sdk-s3
You can now see the two added dependencies in the Cargo.toml file.
[dependencies]
aws-config = "0.52.0"
aws-sdk-s3 = "0.22.0"
Now we will instantiate the SDK by loading the configuration from the environment and creating a client.
|
|
We create a config variable by using the let statement and then use aws_config::load_from_env() to load the environment configuration. As the runtime is asynchronous, we add the await statement to retrieve the value.
We then instantiate the S3 client by using aws_sdk_s3::Client::new(&config). The & operator means that we pass the reference to config to the new function. Passing references is a key aspect of how Rust manages memory. If we didn’t pass the &config, Rust would have considered that we no longer needed the config variable and dropped it. You can read more in the Rust book in the ownership section.
We retrieve the Object using the SDK.
|
|
I’d like to stop here for a second as we start interacting with the AWS APIs.
We build an API call by starting from the client and then concatenating the operation get_object() followed by the parameters bucket(&bucket) and key(&key). We then send() the request and as it is an asynchronous call, we await the response.
By using the let result = we assign the result of the API call to the result variable.
Every API call will return a Result which is an error handling mechanism in Rust. We will use the match operator to evaluate the different cases (success or error).
|
|
If the operation is a success Ok(output) we execute the statement on the right hand (=>) which retrieves the body of the object by calling the collect() function. It returns a Future that we wait using the await statement. Again the call is a Result which needs to be processed. Here we use the question mark ? operator to tell Rust to return the value or to propagate the error. It is a shortcut to avoid too many match operators.
If the operation GetObject is an error Err(e) we write an error log, and we exit the handler with the error.
Generate the thumbnail
In order to generate a thumbnail, we will use another crate which is built to handle pictures. The crate is called image and looking at its documentation it can read an image from memory and generate a thumbnail from this image.
Let’s get started by adding the crate,
cargo add image
then modify the main.rs file to use the image module and transform our image.
|
|
We invoke the load_from_memory function to try to import the object as an image. We then apply the thumbnail function to resize the image. The pattern is similar to the get_object API call earlier. load_from_memory will return a result that we process with a match operator. If the operation is a success then the image is assigned to image variable. If not we log the error and exit.
Upload the thumbnail
To upload the thumbnail, we need to write the image into a buffer as a JPEG image, generate the filename, derived from the initial object key to not overwrite the picture. We finally call the put_object operation to upload the buffer to an Amazon S3 object.
|
|
Archive the original object
To change the storage class of an object, we need to copy the object to the same location and changing the storage class parameter. We use the copy_object() method of the S3 client. The parameters are a copy_source string which requires to be URL encoded. There is a library called urlencoding that we will add to this project.
cargo add urlencoding
|
|
Below is the complete main.rs file that we created.
|
|
Test your function locally
cargo lambda provides some tools to run your function locally and test its behavior before deploying it. cargo lambda watch launches a server listening on port 9000. Use the command cargo lambda invoke --data-ascii '{}' to invoke the function. This way you can iterate over your code and see where you have some bugs. It also re-compiles your code after changes.
Now open two terminals in the project directory and enter the following command in the 1st terminal:
cargo lambda watch
and in the second terminal enter:
cargo lambda invoke --data-ascii '{}'
Once you hit enter, you will see that the compiler is building on the fly the Lambda function and starts the execution. The terminal one should return something like with the detail of the invocation:
ERROR Lambda runtime invoke{requestId="fca26b37-d8a1-4890-9c2f-7a8c350d9356" xrayTraceId="Root=1-63c1ae81-6a215122a9eb40caa0b16056;Parent=77fbc8d0e0c59adb;Sampled=1"}: Error("missing field `detail`", line: 1, column: 2)
while the terminal 2 will return only the inner error message
Error: serde_json::error::Error

  × missing field `detail` at line 1 column 2
Now let’s try with a valid event
cargo lambda invoke --data-ascii '{"detail":{"object":{"key":"picture.jpg", "size": 1234}, "bucket": {"name":"my_bucket"}}}'

Error: alloc::boxed::Box<dyn core::error::Error + core::marker::Send + core::marker::Sync>

  × unhandled error
We now see that the event is processed correctly but the error is unhandled. We have more details in terminal 1 where the error has been logged.
ERROR Lambda runtime invoke{requestId="8c641830-6358-443d-b266-f398bdc36b0d" xrayTraceId="Root=1-63c1badb-6cc969048a7388afb192699b;Parent=23fc8aaca58ee2c3;Sampled=1"}: GetObjectError { kind: Unhandled(Unhandled { source: Error { code: Some("PermanentRedirect"), message: Some("The bucket you are attempting to access must be addressed using the specified endpoint. Please send all future requests to this endpoint."), request_id: Some("9WZ3EF00KEGW0KDM"), extras: {"s3_extended_request_id": "J1SO1A62y0NES+MpsKfjNWoI5Krh/4bZ6EqNc6U5NDYXtJwVGDknFRj53lJkYDH6ed3ugdHtiHI="} } }), meta: Error { code: Some("PermanentRedirect"), message: Some("The bucket you are attempting to access must be addressed using the specified endpoint. Please send all future requests to this endpoint."), request_id: Some("9WZ3EF00KEGW0KDM"), extras: {"s3_extended_request_id": "J1SO1A62y0NES+MpsKfjNWoI5Krh/4bZ6EqNc6U5NDYXtJwVGDknFRj53lJkYDH6ed3ugdHtiHI="} } }
Now let’s jump to the next part where we will create a new bucket and start uploading a picture.
Deploy to your AWS Account with SAM
We will create a CloudFormation template using the Serverless Application Model to build our application. Let’s get started with creating a simple bucket.
Deploy the bucket
Create a new file in your project directory named template.yaml and paste the following code. It will create a new Amazon S3 Bucket in your account with a random name. We will add afterward the integration with AWS Lambda.
|
|
Then we use sam CLI tool to deploy the template.
sam deploy --guided

Configuring SAM deploy
======================

        Looking for config file [samconfig.toml] :  Not found

        Setting default arguments for 'sam deploy'
        =========================================
        Stack Name [sam-app]: # enter the name of your application here
           Stack Name [sam-app]: img-archiver
        AWS Region [eu-west-1]:
        #Shows you resources changes to be deployed and require a 'Y' to initiate deploy
        Confirm changes before deploy [y/N]:
        #SAM needs permission to be able to create roles to connect to the resources in your template
        Allow SAM CLI IAM role creation [Y/n]:
        #Preserves the state of previously provisioned resources when an operation fails
        Disable rollback [y/N]:
        Save arguments to configuration file [Y/n]:
        SAM configuration file [samconfig.toml]:
        SAM configuration environment [default]:
Select the default options. At the end of the deployment, the SAM tool will display the name of the bucket created.
----------------------------------------------------------------------------------------------------------------------------
Outputs
----------------------------------------------------------------------------------------------------------------------------
Key                 BucketName
Description         Name of the bucket
Value               img-archiver-bucket-4isywdroe8s1
----------------------------------------------------------------------------------------------------------------------------
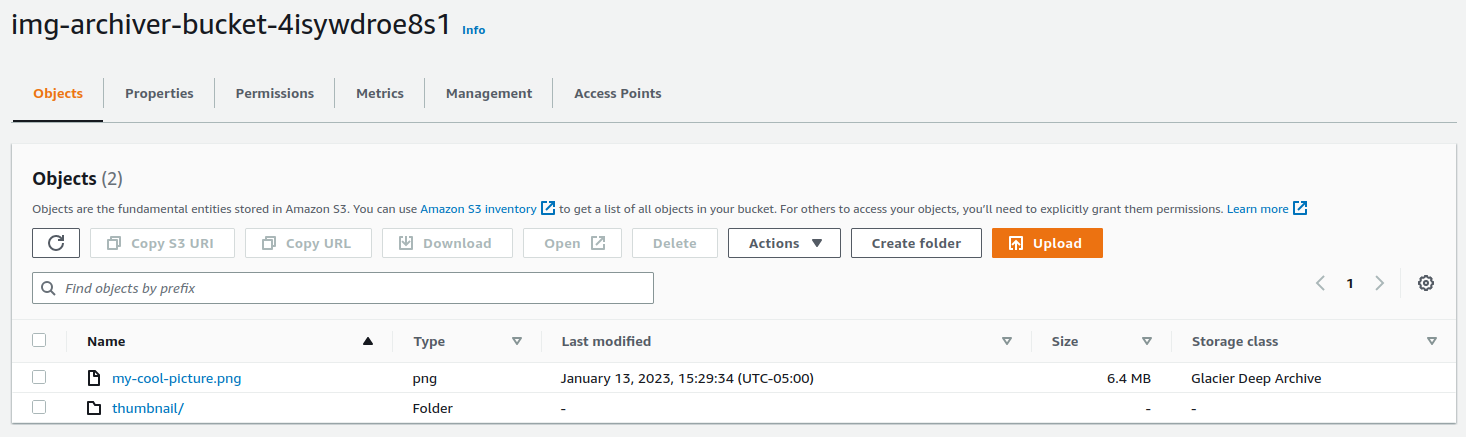
Upload a picture to the newly created bucket (here img-archiver-bucket-4isywdroe8s1) and check if your lambda works.
aws s3 cp my-cool-picture.jpg s3://img-archiver-bucket-4isywdroe8s1/my-cool-picture.jpg
Invoke your function using the following command
cargo lambda invoke --data-ascii '{"detail":{"object":{"key":"my-cool-picture.png", "size": 1234}, "bucket": {"name":"img-archiver-bucket-4isywdroe8s1"}}}'
Once the processing is done, it should return null and you can confirm that your file has been archived by checking its storage class and that the thumbnail file exists by using the AWS CLI or the AWS Console.
aws s3api head-object --bucket img-archiver-bucket-4isywdroe8s1 --key my-cool-picture.png
{
    "AcceptRanges": "bytes",
    "LastModified": "Fri, 13 Jan 2023 20:29:34 GMT",
    "ContentLength": 6692553,
    "ETag": "\"ef0eeecca3eee585ffcd78dba8295f0c\"",
    "ContentType": "image/png",
    "ServerSideEncryption": "AES256",
    "Metadata": {},
    "StorageClass": "DEEP_ARCHIVE"
}
aws s3 ls s3://img-archiver-bucket-4isywdroe8s1/thumbnail/
2023-01-13 15:29:34      49700 my-cool-picture.jpeg
Deploy the application
Now that the code is working, let’s add a new resource in our CloudFormation template for the function.
|
|
We told CloudFormation to deploy an ARM-based function and trigger it when EventBridge (CloudWatchEvent) matches an event for a newly created object under the archive prefix. We also need to compile our code before being able to upload. For that step we will use cargo lambda tool which also allows cross-platform compilation to compile into arm64.
cargo lambda build --release --arm64
Run sam deploy to update the previous deployment with the Lambda function.
sam deploy
Upload a nice picture to the archive prefix.
aws s3 cp my-cool-picture.png s3://img-archiver-bucket-4isywdroe8s1/archive/my-cool-picture.png
Validate that it has been archived.
aws s3api head-object --bucket img-archiver-bucket-4isywdroe8s1 --key archive/my-cool-picture.png
{
    "AcceptRanges": "bytes",
    "LastModified": "Fri, 13 Jan 2023 20:29:34 GMT",
    "ContentLength": 6692553,
    "ETag": "\"ef0eeecca3eee585ffcd78dba8295f0c\"",
    "ContentType": "image/png",
    "ServerSideEncryption": "AES256",
    "Metadata": {},
    "StorageClass": "DEEP_ARCHIVE"
}
aws s3 ls s3://img-archiver-bucket-4isywdroe8s1/thumbnail/archive/
2023-01-13 15:29:34      49700 my-cool-picture.jpeg
Conclusion
In this blog post we have built a Lambda function in Rust to automate the archiving of pictures. It loads the pictures into memory, save a thumbnail to S3 and then changes the storage class to Glacier for cost savings.
In terms of performance, I have not performed a benchmark but I was able to process all the pictures as I copied them without worrying. P99 was about 1.5s for image conversion.
In a next post, I will cover some improvements to this Lambda function such as refactoring some parts into a library, better error handling and retrieving the first few bytes of a file to make sure that it is a picture. I had some videos in my library and I didn’t need a thumbnail for them.
If you want to get the complete source code, you can find it here